
Reading the wrong mark on a ruler gives you the wrong size, and a small slip can ruin a school project, a cut piece of fabric or a shelf that does not fit. This guide shows you how to read a ruler step by step, starting with the zero mark and the numbered lines. You will learn how ruler markings work on the metric side (centimeters and millimeters) and on the inch side (halves, quarters, eighths and sixteenths). Clear examples show how to read ruler marks, and the most common mistakes are covered at the end.
Parts of a Ruler
Every ruler has the same few parts, and knowing each one makes the markings easy to follow.
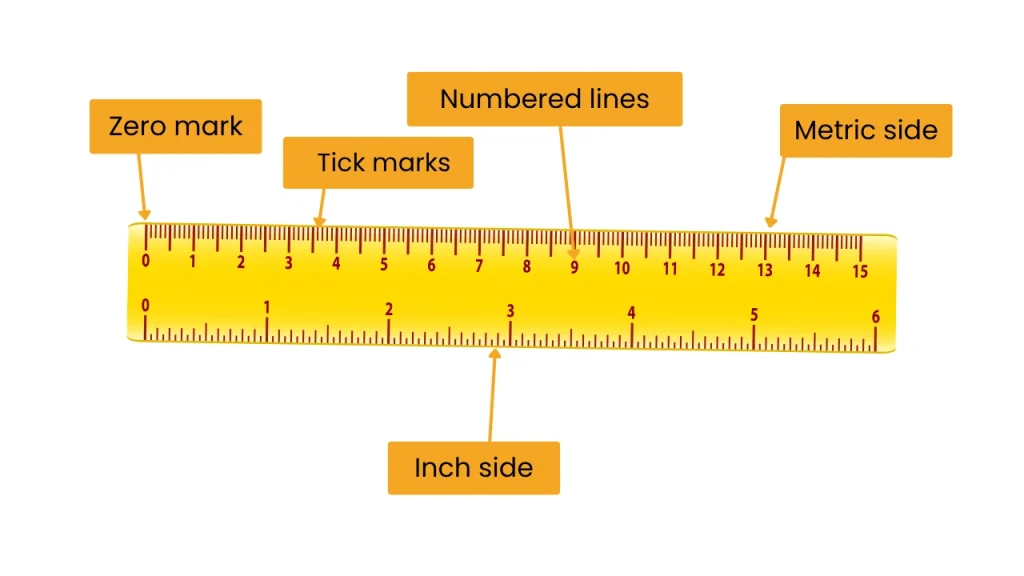
- Zero mark: This is the line where every measurement starts. On many rulers zero sits slightly in from the end, so the end of the ruler is not always zero.
- Numbered lines: These long lines carry a number and show whole units, such as 1, 2 and 3.
- Tick marks: The shorter lines between the numbers split each unit into smaller parts. The shorter the line, the smaller the part.
- Metric side: This edge shows centimeters, with ten small millimeter marks between each numbered line.
- Inch side: This edge shows inches, split into halves, quarters, eighths and often sixteenths.
Ruler Markings Explained
Metric Side (cm and mm)
On the metric side, each numbered line marks one centimeter (cm). The small ticks between two numbers are millimeters (mm), and every centimeter holds ten of them. For example, a line three ticks past the 4 reads 4 cm and 3 mm, or 4.3 cm.
Count the ticks from the last number instead of guessing. The middle tick, which marks 5 mm, is usually a little longer, so it works as a quick landmark. Readers who want a metric ruler on screen can use the cm ruler or the mm ruler. These ruler marks follow the same pattern on every metric ruler.
| Mark | What it means |
|---|---|
| Numbered line | 1 cm |
| Small tick | 1 mm |
| 10 small ticks | 1 cm |
| Middle tick between two numbers | 5 mm, usually a little longer |
Inch Side
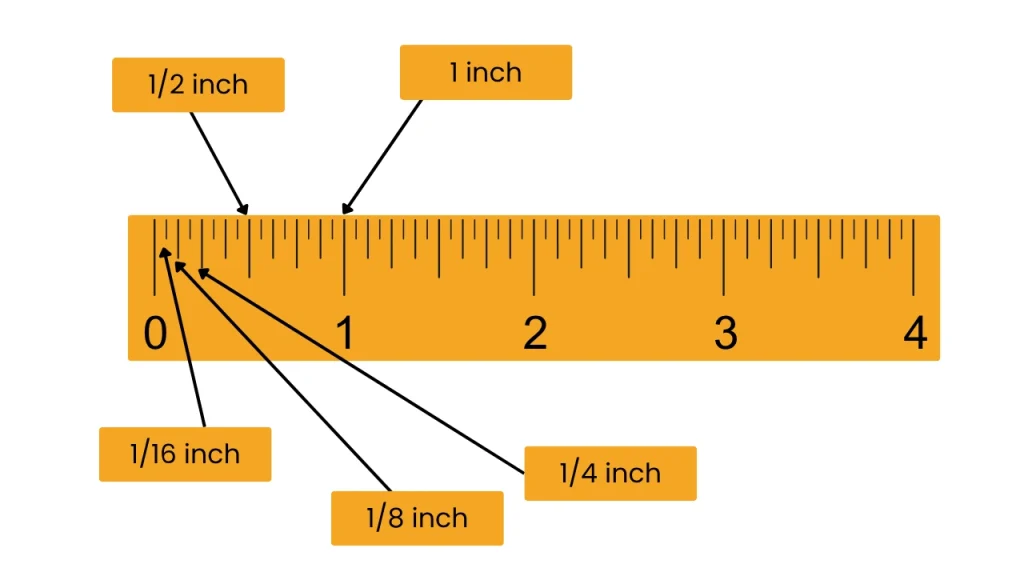
The inch side follows one rule: the shorter the mark, the smaller the fraction. The longest line is the whole inch and carries the number. Below it come the half inch, the quarter inch, the eighth and the sixteenth, and each one is shorter than the last because each splits the space in half again. Learn this order and the ruler markings stop looking crowded, because you can judge a mark’s size from its length alone. Keep in mind that 1 inch equals 2.54 cm, so the two sides of a ruler describe the same length in different units. To practice reading inches on screen, open the inch ruler after calibrating it.
| Mark | Size |
|---|---|
| Whole inch | 1 inch, longest line with a number |
| Half inch | 1/2 inch, second longest |
| Quarter inch | 1/4 inch, shorter than the half |
| Eighth inch | 1/8 inch, shorter than the quarter |
| Sixteenth inch | 1/16 inch, shortest line |
How to Read a Ruler Step by Step
Reading a ruler is a short routine, and the same five steps work on both the metric side and the inch side.
- Start at zero: Find the zero mark first, and do not assume the physical end of the ruler is zero.
- Put one edge of the object at zero: Line up the edge of the object you are measuring exactly with that mark, and keep the object flat against the ruler.
- Look at the other edge: Find where the far edge of the object lands on the scale. Keep your eye directly above that point so the line does not appear to shift.
- Note the last full numbered line: Find the last numbered line the edge has passed. This gives you the whole units.
- Count the small ticks after it: Count each tick from that number up to the edge. Ticks on the metric side are millimeters, and ticks on the inch side are fractions of an inch.
Add the ticks you counted to the last full number. On the metric side, each tick is 1 mm. On the inch side, each tick is a fraction of an inch, such as 1/16. Go slowly the first time and count every tick instead of guessing. Always write the unit with the number, such as cm, mm or inches, because a bare number does not tell anyone what size you mean.
Reading Measurements on a Ruler: 3 Examples
These three examples show how to read measurements on a ruler in the situations you will meet most often.
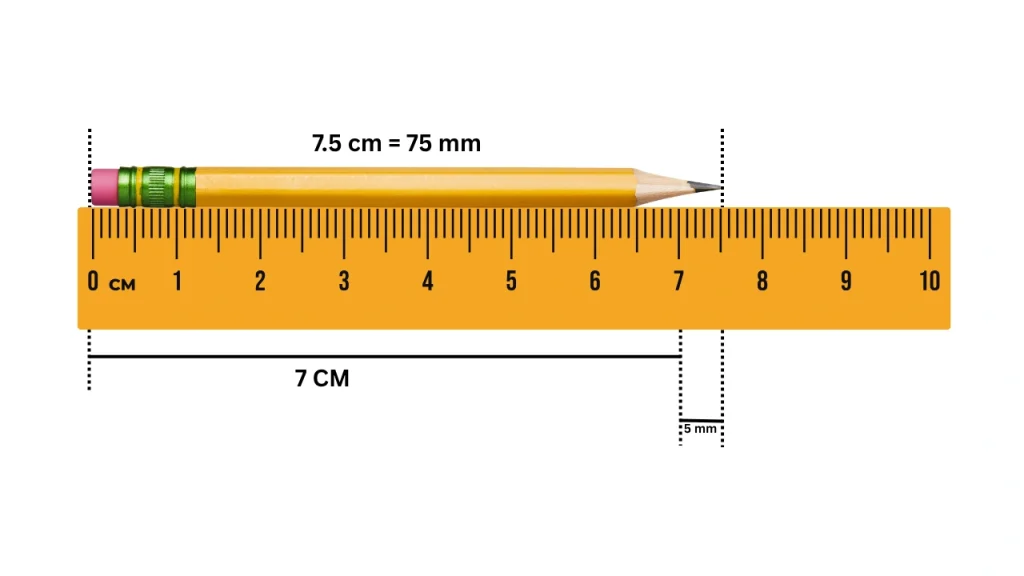
Metric example: A pencil starts at zero and its tip ends 5 ticks after the 7 cm line. Each tick is 1 mm, so the pencil measures 7 cm and 5 mm. That is 7.5 cm, or 75 mm.
Inch example: One edge of a card sits at the 2 inch line, and the other edge lands on the half inch mark after it. The whole number is 2, and the half inch mark adds 1/2. The card measures 2 1/2 inches.
An object that does not start at zero: Sometimes an object is not lined up with zero. Say it starts at the 3 line and ends at the 8 line. Subtract the start from the end: 8 minus 3 is 5. The object is 5 units long, so write 5 cm or 5 inches, depending on the side you used.
This method also helps when the end of a ruler is worn or the zero mark is hard to see. Pick any clear numbered line as your start, then subtract it from the end reading.
How to Use a Ruler to Measure an Object
Good placement matters as much as good reading, so set up the ruler before you look at a single mark.
- Lay the ruler flat against the object: Press the ruler close to the object so there is no gap between them. A raised ruler makes the object look longer or shorter than it is.
- Keep the ruler straight along the edge: The ruler should run parallel to the edge you are measuring. A tilted ruler always gives a reading that is too long.
- Align the object’s edge with zero: If the zero of your ruler is set in from the end, line the edge up with the 1 mark instead and subtract 1 from your final reading.
- Look straight down at the mark: Reading from an angle makes the line appear to move, an error called parallax. Keep your eye directly above the point you are reading.
- Mark long objects with a pencil: If the object is longer than the ruler, make a small pencil mark where the ruler ends. Move the ruler so its zero sits on that mark, then add the two lengths together.
- Hold the ruler still while you read: Use your free hand to press down on the ruler. Even a small slip can move the zero away from the edge of the object.
Common Mistakes When Reading a Ruler
Most wrong results when reading a ruler come from five small slips, and each one is easy to fix.
- Reading the cm side and the inch side together: The two scales sit on the same ruler, but their numbers do not match. Choose one side and stay on it from start to finish.
- Treating the end of the ruler as zero: On many rulers the scale starts a little in from the end. Find the zero mark first and line the object up with it.
- Counting ticks wrongly: Start counting from the last numbered line, and do not count that line itself. The longer middle tick helps you keep your place.
- Reading from an angle: Looking from the side makes the edge of the object seem to line up with a different mark. Look straight down at the mark you are reading.
- Measuring along a slanted line: If the ruler is tilted, the object looks longer than it is. Keep the ruler straight along the edge you want to measure.
Practice Reading a Ruler on Screen
If a physical ruler is not nearby, you can practice on a screen or on paper. A screen ruler is only as accurate as its calibration, so calibrate it first, for example with a standard credit card, which measures 85.60 by 53.98 mm. A printed ruler works too: print the PDF at 100 percent scale, then check that the credit card outline on the page matches a real card. If the outline is the wrong size, the printout is not at actual size.
- Use the online ruler for a ruler on screen.
- Use the printable ruler for a paper ruler.
FAQs
Q1: Why does my ruler not start at zero at the edge?
Ans: Many rulers leave a small blank margin before the zero line to protect the first mark from wear. Measuring begins at the zero line, not the physical end.
Q2: How do I measure an object that does not start at zero?
Ans: Subtract the start reading from the end reading. If it runs from 2.5 cm to 6.5 cm, the length is 4 cm.
Q3: What do the different line lengths on a ruler mean?
Ans: Longer lines mark larger parts, such as whole units or halves. Shorter lines mark smaller parts, such as millimeters or sixteenths. Reading a ruler by line length is faster than counting.
Q4: How many mm are in 1 cm, and how many cm in 1 inch?
Ans: There are 10 mm in 1 cm, and 2.54 cm in 1 inch. Use these two facts to check a reading on one side against the other.
Q5: How can I tell which side of a ruler is cm and which is inch?
Ans: Check the printed labels near the edge, usually “cm” and “in”. The metric side has ten small ticks between numbers, while the inch side splits into fractions.